Showing posts with label DIY. Show all posts

Monday, February 2, 2015

DIY Valentine’s Day Banner

Hello, friends! Today I have a really cute and easy DIY project just in time for Valentine’s Day.

Vday Banner with text

I actually made this “Je T’Aime” banner last year for Valentine’s Day, but I was going through a bit of a blogging hiatus and therefore never got it posted. But I wanted to make sure I posted directions this year so you had a chance to make one for yourself!

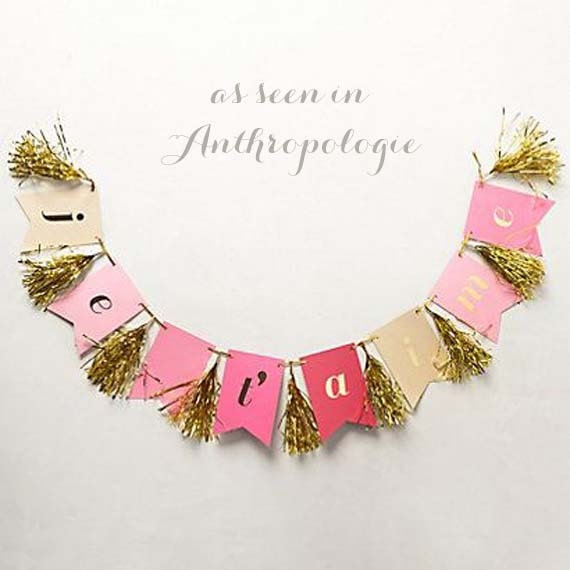
My banner was inspired by this one by michiemay on Etsy. It was for sale on Antropologie last year, which is where I found it.

Je t'aime Banner

Isn’t it cute?! Now I absolutely support buying from individuals on Etsy, so if you’d like to buy the pre-made banner from her, go for it! I didn’t have $40 to spend on Valentine’s décor so I made my own version.

For my DIY version, here is what you’ll need:

Materials

  • Four sheets of cardstock in various hues of red and pink
  • Four sheets of tissue paper (I used two colors but you can just use one if you want)
  • Ruler and pencil
  • Sharpie
  • Ribbon
  • Hole punch
  • Paper cutter (optional)
  • Fancy edge scissors (optional)

Start by making your letters.

1. Cut out a 3” x 6” rectangle from your sheet of cardstock, either using scissors or a paper cutter. You’ll need two rectangles from each sheet.

2. Measure 1.5” from the bottom of the sheet and mark it. Make another mark 1.5” from the edge (center of the width). Make the intersection of these two points, and use your ruler to draw a straight edge from the bottom corners to this point. Cut out the triangle.

Step 1

3. If desired, use the fancy edge scissors to trim all edges of the rectangle.

Step 2

4. Draw one letter onto each piece. I free-handed mine, but if you prefer you can use stencils, stickers, etc. Be sure to draw on the side opposite of the one with your pencil markings. For the ombre look, start with your darkest shade of cardstock, then work in so the palest color is in the center, and back out so your darkest color is at the other end again. Be sure to leave one piece blank for the space between “Je” and “T’aime.”

5. Punch a hole in both upper corners of each sheet. I used a heart punch because that’s what I had around, but you can certainly use a regular hole punch.

Step 4

Next, make the tissue paper tassels.

1. Unfold your sheet of tissue paper, then fold it in half, and in half again.

Step 5

2. Make the fringe by cutting small strips in the tissue paper, starting at the open edges. Leave about an inch from the top, folded edge uncut. I found it easier to cut the paper when I placed something on the top edges. This helped me keep the layers together when I made the cuts.

Step 6

3. Once you’ve cut all the fringe, unfold the paper lengthwise.

Step 8

4. Cut it in half. This will give you two tassels out of each sheet of tissue paper.

DSC_0907

5. Unfold the cut sheet.

Step 10

6. Tightly roll up the tissue paper lengthwise.

Step 11

7. Tightly twist the center part of your tassel.

Step 12

8. Twist the middle section into a loop. You should be able to twist it tightly enough that you don’t need to secure it, but if you want to make sure it stays together you can use a small drop of hot glue.

Step 13

Now you’re ready to assemble the banner! Cut a length of ribbon around 6 feet long and string on your materials, alternating letters and tassels. If you’re using a thin ribbon you may need to knot the ribbon around the letters and tassels so they don’t slide. I didn’t need to do that with my banner.

Vday Banner

Use washi tape or another tape that won’t damage your surface to tape the banner to your mantle. You could also use the banner to decorate a buffet, stair rail, or doorway.

Vday Banner 2

That’s it! The whole project took me about 30-45 minutes, pretty simple. I had all the materials on hand from my old scrapbooking stuff and other craft supplies, but if you went out and bought everything it shouldn’t cost you more than $5.

Do you decorate your home for Valentine’s Day? I’d love to see your décor, especially any DIY projects! Leave a note in the comments section. And if you make this banner, please share it with me! Leave a comment or tag me on Instagram or Twitter (@blue11interiors).

P.S. I’m also excited to announce that I’ll be making this project on TV this Wednesday! If you’re in the Kansas City area, you can see me on Better KC on KCTV5 Wednesday, February 4 at 9 a.m. I’d love to know I have a few friends watching!

Thursday, April 17, 2014

Spring Tablescape + a DIY Failure

I finally finished my Spring tablescape, just in time for Easter weekend. Actually we won’t even be here for Easter; we’re flying to West Palm Beach, Florida tomorrow morning and staying for the long holiday weekend! But I still wanted to add some spring décor to the house before Easter. Here it is!

Spring Table 6

Spring Table 3

I’ve done a seasonal tablescape for the last two seasons (Fall and Christmas) but I hadn’t done one since December so it was definitely time to add a bit of spring to the house. This season’s table décor consisted of three main parts: a DIY fabric table runner; blue metal baskets filled with Easter grass and candy eggs; and some vintage brass candlesticks with taper candles.

Spring Table 2

Other than the DIY table runner, which I’ll share a tutorial for next week, there’s not very much explanation or instruction needed for my table décor. I found the brass candlesticks at a local thrift store last month and I really wanted to use them as a centerpiece. The blue tins were $1 each at Target, and I made them perfect for Easter by filling each basket with a mix of green and pink plastic Easter grass and then topping them with some Whopper’s Robin Eggs candy. I made the table runner out of two yards of a cute spring green Moroccan print fabric from Hobby Lobby.

Spring Table 1

Spring Table 4

Spring Table 5

Spring Table 8

Cute, right? I love simple and inexpensive décor like this. Here’s a rundown of what I spent:

  • Fabric: $10
  • Straight pins for fabric: $3
  • Candlesticks: $9 for a set of 7 (I only used 5 here)
  • Metal baskets: $2
  • Easter grass: $1
  • Candy eggs: $2
  • Taper candles: $5
  • Total = $32

Not too bad! I have plenty of fabric leftover to use for another project (maybe a spring wreath?!), and I will definitely reuse the candles and candle holders in other areas of the house or other table décor once I’m done with this season’s table.

You might be wondering what the “DIY Failure” mentioned in the title is. Well, the same day I got the brass candlesticks from the thrift store I also got three very ugly Easter bunny figurines for a total of $2. Here’s a “before” pic.

IMG_2885

Not horrible, but definitely not for me. The white bunny was almost ok as-is but it was super dirty and stained. I thought they would look really cute spray painted, so I got some spray paint primer and a pretty buttercream yellow can of spray paint. I thought that the repainted figurines would look nice as party of my Easter tablescape. Easy little DIY project right? You be the judge:

IMG_2891

Yuck! And this is after 2 coats of primer and 3 coats of yellow paint. I think the two brown bunnies were just the completely wrong texture to try to spray paint: they have too many tiny nooks and crannies. The white rabbit could have turned out okay, but instead it just looks like my dog peed all over it. Not so pretty.

So no Easter bunnies for my Spring tablescape this year, oh well. At least I’m not out very much money due to my DIY failure.

Do you decorate your house of Spring and/or Easter? Do stick to traditional décor like bunnies and eggs, or do you do something more unexpected?

Monday, April 14, 2014

Instant Art for $0.99

Happy Monday everyone! I hope you all had a lovely weekend. I’m sorry I didn’t get to my spring tablescape last week like I said I would. I came down with a nasty cold that pretty much knocked me out from Wednesday to Saturday, so I didn’t get to my crafting like I had planned. So stay tuned this week, as long as I remain healthy I should get it done in the next few days!

While I was sick last week I spent a lot of time on the couch, playing on my iphone and ipad, and I downloaded a new app that I think might be my favorite app of all time. It’s called Waterlogue, have you guys heard of it? It costs $0.99 and while I don’t download very many apps that cost money this one is totally worth it. It will turn any photo into a gorgeous watercolor painting! Check out what I did with some of my pictures from Paris:

Notre Dame Waterlogue

Paris Flowers Waterlogue

Sacre Coeur Waterlogue

Paris Locks Waterlogue

Eiffel Tower Waterlogue

Aren’t they pretty?! I want to frame every one of these! I love that the app gives you a bunch of choices of filters so you can create a print that’s more detailed (like the flowers), or more blurred out (Notre Dame), or one that has heavy outlines (Sacre Couer). These are just a few of the effects available, there are a lot more that I didn’t end up using.

I also created a watercolor of my living room to see what the app would do with a more every day photo:

Living Room Waterlogue

So fun, right! I haven’t printed any of the watercolor prints out because my cheap printer runs through ink like it’s air and I didn’t want to burn through my ink cartridge, but if you do have a good printer you should definitely try printing out some Waterlogue pictures! I would print them on to a nice cardstock so it feels more like a real painting. I’d imagine that they’d also turn out well if you you got them printed through a photo printing service. Just make sure to get a matte finish on your photos.

Have any of you tried Waterlogue yet? I’d especially love to hear from someone who printed some of their images to see how they turned out!

Friday, December 6, 2013

Red and Gold Christmas Tablescape

Happy Friday everyone! I’m getting a little closer to having the house decorated for Christmas. I still don’t have a tree but my mantle is almost done, most of the accessories are out, and my dining table is looking beautiful!

IMG_2594

My Christmas tablescape was definitely a use-what-I-had/make-it-up-as-I-go-along kind of project. I kept the burlap runner I used for my autumn table and I added three red snowflake placemats I bought last year from Pier 1.

IMG_2593

The gold snowflakes are ornaments from a set I bought from Target on clearance after Christmas last year, and the “candle holders” are wine glasses. I had seen this done on Pinterest and I had wanted to try it for a while. The gold decorations under the glasses are from a couple tree picks I bought last year from Hobby Lobby; I simply trimmed the tops off with wire cutters.

IMG_2591

IMG_2588

I made the tree out of pages from an old book. I didn’t take step by step pictures but this was a very easy, although somewhat time consuming, project. I started by forming a cone out out of a flattened fruit snacks box and then I attached approximately a million strips of paper using double stick tape. Each piece was about 0.75” x  2” and I curled every strip by rolling it around a pencil. I finished the top of the cone by wrapping a small piece of washi tape around the border, and then I stuck another piece of the gold tree pick in the top to fashion a tree topper of sorts. The whole project took me about an hour and a half. My fingers were definitely tired of double stick tape by the time I was finished but I’m really happy with how it turned out.

IMG_2589

I wanted to give the tree a little more height so I propped it up on a silver gift box that I had. I love the extra shine that it adds to the table.

IMG_2595

IMG_2592

So there it is, my festive red and gold Christmas tablescape. My favorite part of this project is that I didn’t have to spend any money to make it, but if you wanted to recreate it from scratch you could certainly do so without spending a ton.

Tonight I’m planning to finally get my Christmas tree so I can hopefully finish Christmasfying the house this weekend. Stay tuned!


**Linking up to the Party Brunch**

The 36th Avenue

Monday, October 7, 2013

Fall Table: Done!

Last week I showed you my fall décor table inspiration and a sneak peek of the nearly finished product, and today I am excited to show you the fully decorated table!

fall table 3

I started with this 10’ roll of burlap I bought from Michaels.

burlap table runner

Then I took 3 simple vases I already had (originally from the dollar store), and wrapped them with the same yarn I used for my Autumn Wreath. I don’t have any step by step photos for this DIY but the process is simple. I just used a small dab of hot glue to secure the ends of the yarn to the vase.

Fall Table 1

I found a pretty bunch of faux flowers from Michaels for $4 for the center vase and I used simple pillar candles for the other two.

Then I added some faux fall leaves I had from last year, some mini pumpkins and gourds from the grocery store, and some faux acorns I got in the dollar section at Target.

Fall table 4

I’m so happy with how it all came together!

fall table 2

fall table 6

And like my wreath I was able to complete this project without spending much money.

  • Burlap runner (with 40% off coupon): $8
  • Flowers: $4
  • Mini pumpkins and gourds: $4.50
  • Acorns: $1
  • Total: $17.50

Not bad if I say so myself Smile What do you think? Have you put out any fall decorations yet?

Friday, October 4, 2013

Fall Table Sneak Peek

My table is almost ready to show you; I just have to get a couple more little things. But I said I would be ready to show it to you by Friday so here’s a small sneak peek until I post the finished project on Monday.

IMG_1975


Have a wonderful weekend!

Thursday, October 3, 2013

Autumn Yarn Wreath DIY

I have a new DIY project to share with you today! I’m still working on my fall table decorations, but in the meantime I made a new seasonal wreath for the front door.

Yarn Wreath

I started with a plain foam wreath and two different colors of yarn from Michaels.

Wreath Supplies

Then I marked the wreath with a sharpie so I would have a guide for where to start and stop with each color.

Marked Wreath

Then I started wrapping. I just used a piece of scotch tape to secure the pieces of yarn to the back (marked) side of the wreath. That’s it. And I wrapped…and wrapped…and wrapped. It takes a surprisingly long time to do this, but I got in some quality TV time while I worked on it.

P.S. This whole process would probably be much easier if I didn’t have a cat constantly watching me and trying to get ahold of the yarn so he could play.

Once I was done with the yarn part I added a coupe simple embellishments. I used wire cutters to snip a few flowers off this bunch I bought for 50% off.

IMG_1966

I left about an inch and a half of the stem on each flower so that I could just poke the wire stem into the foam wreath. Easy!

For the last step I added a simple bow using some green ribbon I got on clearance for $1. Then I hung the wreath from the 3M hook on the back of my door like I did with my summer wreath.

Yarn Wreath Door

Yarn Wreath

I think it turned out pretty well! It was fairly inexpensive too:

  • Foam wreath: $7
  • Orange yarn: $4
  • Beige yarn: $3
  • Green ribbon: $1
  • Faux flowers: $4
  • Total: $19

So for less than $20 I was able to make a fall wreath that I love. Not a bad deal!

I’m sharing this project on the It’s Fall Y’All link party on Southern Hospitality, check it out for more awesome fall décor ideas!